I’m out of Greens!

This slideshow requires JavaScript.

I eat a giant salad every day for lunch.  I even bought special bowls (which would classify as serving bowls) to accommodate my giant salad needs.  Our refrigerator is always busting with an overabundance of greens, so imagine my panic when I came up empty-handed on the lettuce front!  BUT I NEED MY SALAD!

In the words of Douglas Adams, “DO NOT PANIC!”  I’ll happily show you how to feed yourself without an emergency trip to the store. You really don’t need whatever ingredient you’re missing, so I hereby grant you free reign to experiment in yo’ kitchen!

Luckily, I have been on quite a tropical fruit streak.  We have so much produce in my house that it is spilling over from the fridge onto the counter, the dining room table, and sometimes on top of the fridge and other kitchen real estate.

Tip:

When you keep your house constantly stocked with plants, you will never go hungry.  Never leave the grocery store without a serious review of the produce department. Try something you’ve never seen before, like starfruit or jicama, whatever thing they have that you aren’t familar or even comfortable with, then google it and try something.

After an inventory of what I had on hand, I came up with this amazing salad.

Mango, celery, tomato, coconut (leftover from my previous bacon making project -that coconut came in really handy in all kinds of areas) and sprouted beans (crunchy mix, I always have some sort of weird sprout as a salad topping.)

I chopped them and grated them, then mixed with dashes of mango/tangerine juice, apple cider vinegar, and a little maple syrup (always the real kind, never the grody fake stuff.) Just whatever I had that would make a dressing.  I sprinkled with fresh grated pepper and of course, some of my awesome coconut bacon flakes.

This was one of the best salads of my life.

tip:

Leftovers make great salad toppings.  All week, I’ve been adding mini bowtie pasta (farfellini) to my salad, rice or any cooked grain stashed in the fridge, lastnight’s tofu cubes, whatever, go crazy. A salad is your frontier to do whatever you want. Like nachos or lasagna.  It’s just a leftover free for all.

Don’t be afraid to throw whatever you have together.  Once in a blue moon, you’ll have a miss (like when I tried to juice an onion with veggies -do not do this.) For the most part, the experiments always turn out better than you would think. Plants really love playing together, so you have a lot of wiggle room.  It may save you a few trips to the grocery store when you make do with whatever you have. Some of my best meals have been on “time-to-clean-out-the-fridge/pantry-before-we-restock/get-paid” days. I eventually restocked my greens, but survived a day with a greens free salad, and became a tropical salad goddess for a day. I am truly a legend in my own mind. Go be a legend! 

Coconut Bacon

This slideshow requires JavaScript.

I am in love with all things coconut.  The oil, the milk, the flesh, the shells as a bathing suit. All of it.  So when I saw whole husked coconuts in the grocery store, Mama had to load ’em up.  The husk is huge, once removed you have the round brown hairy shell we all recognize as a coconut.  (The ones that are cut into that gem like shape that’s white are young coconuts, and their meat will not be firm enough for bacon, but it does other awesome things.)

I brought it home and went to work. Opening a coconut and harvesting its meat is quite a job. Luckily I have a lot of experience from my youth, growing up in Hawaii, so I know my way around a coconut.  Piercing the eyes (I call it the monkey face) with a nail or whatever you have to drain the milk (water) first, you are instantly rewarded with a fresh electrolyte beverage.  Nature’s Gatorade, sooooo delicious. Now that you’re hydrated, you really have to get to work.

Figure out a way to cut (smash) the coconut in half without killing yourself.  Put the halves in the oven for around 30 minutes on 350, and then put in the freezer til cooled.  This will separate the meat from the shell, which you can separate with a screwdriver, knife or what suits you. I used a fish filleting knife, it doesn’t have anything else to do in my kitchen.  But you aren’t done yet. Now you need a very good peeler. (I had to go buy a new one for this project.) Shave off the skin and you’re ready.

So I’ve got my coconut meat ready to use, and I literally have no idea what I’m going to do with it.  I munch on it while I think. I have a bag of Phoney Baloney’s Coconut Bacon in the cupboard, but it’s a lil’ pricey and almost gone. So I’m inspired, I’m going to go for it.

I shave pieces of coconut, probably about a fifth or quarter of the whole nut.  Then I go to the cabinet and look to see what I have that’ll make it “baconey.”  I rarely use recipes or buy stuff to complete one, I just look to see what I have and make it work.  I grab

  • apple cider vinegar
  • honey (out of maple syrup)
  • liquid aminos
  • liquid smoke
  • sriracha
  • black pepper mill
  • onion powder

I toss all this together, it tastes pretty good to me so I throw in the coconut flakes, put a lid on it and shake it shake it shake it.  The vinegar seems to separate the fat from the coconut, so it turns out having little white dots all through it. Kinda cool.

I spread it on a baking sheet (wrinkled foil) and put it in on 350 (since I’m just guessing) and let it go. In less than 10 minutes, the kitchen smells like heaven.

While that’s baking, a quick sidenote on honey. I’m totally vegan, and many vegans are anti honey and think if you eat honey you aren’t vegan.  That is their right, and I won’t stop them.  I decided to do some research to see what the big is, since I know honey doesn’t have any of those harmful effects on humans like meat and dairy.  Actually, it’s really good for you. The deal I found is that it all boils down to anger over the enslavement of bees.  We steal their honey.  We put them to work for us.  Ok, I am a catch and release spider person in my home, and I love all creatures great and small. But if the enslavement of bees keeps you from eating honey, then you better toss out all that organic produce you love, since bees are a big huge part of keeping those farming processes free from pesticides, fertilizers and all that nasty stuff. So enjoy your honey free lifestyle, and wash it down with a fresh glass of chemicals, but I’m personally ok with bees doing a little dirty work so that we can have fresh fruit and pretty flowers. They were born to work, they’re called worker bees. I know, I’m a heartless, heartless bastard.

BACK TO THE BACON! I take it out of the oven after about 12-13 minutes.  It is a little bit unevenly browned, some too much, some not enough, so I might get kicked off of chopped, but as far as tasting good for a home cook, it’s amazing.  Next time, I’ll try it on a lower heat for longer, but this works pretty darn good.  For a first try, it is actually much, much better than I expected.

So you may not want to harvest a coconut and go through all the trouble, but if you find yourself getting all pacific islander and cracking one open, here’s a real good thing you can do once you crack that nut!

Please comment below your feelings about honey.  The angrier the better,convert me.  Do it, do it.  Just go make bacon.

I’m a Dairy Free Milkmaid, and You Can Be, Too!

Getting my milk on

Getting my milk on


If you can run a blender and sit and wait, you can make almond milk.  If you can also boil water, then my friend, you can make rice milk. Ingredients? Almonds, water.  Or, rice, water.  Extra credit? Add stevia and vanilla extract. Now we are getting crazy.  

A gorgeous friend of mine at work was sharing her new found joy of making homeade almond milks and nut butters.  Being that my family goes through 4 cartons a week of Almond milk, I figured, I’d give it a go.  You know when you try something new, and then you find out how easy it is and how much money you can save, you have one of those V-8 moments? Wow, I should’ve figured this out sooner! This was one of those.

WHY would anyone make homeade almond milk? Well, it’s way cheaper. I bought a huge bag of almonds from Costco for 14.99 and I’m only a quarter of the way through it after making three batches of almond milk and one jar of almond butter. ( Priced that stuff lately?) Also, it doesn’t have any weird additives, like carageenan (which I thought was harmless seaweed, but it never really is, is it?)

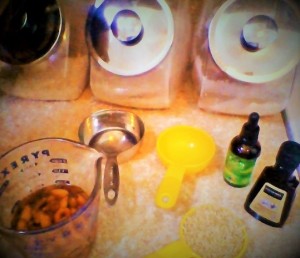
So to get started, you need measuring cups, a pot and water (please use filtered, which you obviously already have on hand.) A blender, a seive, and almonds and brown rice. I’m going to go ahead and walk you through both at the same time, since that’s the way my kitchen experiments tend to roll. A pitcher will also come in handy, although I am using an old large camping water bottle since I only have one pitcher on hand at the moment. (Added to grocery list.)

Here we go:

  • put a 1/3 cup almonds in a measuring cup and add water to soak. Do this earlier, like that morning or the night before. You can get away with doing it now for the first time, while you work on the rice milk. 
  • boil 1 cup of water. as soon as it boils, add 1/3 cup brown rice. It’ll boil quickly, so stay on hand to turn it down to low and cover. Let it simmer for 40 minutes. If you are an ADD adult like me, please set a timer. Wait 40 minutes, write a blog post or something. 
  • Woah! See, when you are busy, that timer goes off fast! Drain any water from the soggy rice, and add some water,around 2 cups, and blend it in a blender. 3 minutes.
  • add another cup or two ( I like two) of water and blend again. You’ll get the hang of how much water to add. I kept adding more after my first batch after we were drinking it out of the fridge until I had the taste right. 
  • After sitting for 30 minutes, spoon off any rice film from the top if it formed, and drain the stuff through a seive, or even better, some cheesecloth. I’ve been using a seive since I have one, and doing a few carefully decanted strains. It still gets a little grainy at the bottom (especially with the almonds), so I am in the market for cheesecloth, but it’s not a deal breaker. 
  • Wait thirty minutes again (I’ll bet you never realized you could get so much housework done while making milk!) spoon off any more film if needed, and strain again into your refigerator holding vessel of choice. Be careful not to let the thick stuff at the bottom dump in, but don’t worry too much about it. Add your stevia and vanilla if wanted, (about 10 drops, 1/2 tsp respectively) or to taste.
  • Okay! Refrigerate and get to the almonds!


  • Take your soaked almonds and drain.  Stick them in the blender with a cup of water and pretty much repeat the rice process. (As followed)
  • blend 3 minutes, add 2 cups, blend 2 minutes.
  • sit for 20 minutes, then strain strain strain.
  • sit again, strain again.
  • Add your flavor as needed, choose your vessel, and refrigerate.

TAH DAH! You are now a dairy free milk maker- CERTIFIED!(by nothing, but you have my blessing.)

Don’t be afraid to tweak, I ended up adding water to my rice milk and it improved drastically.  My Martha Stewart/Pinterest Beaty Queen friend has experimented well with adding blueberries and other amazing things to her almond milk. I’ll be having fun with that stuff too, but for now, I’m just stocking the fridge.   I am looking forward to getting a better straining process going, and I need to tweak my stevia amounts a tad. I’m also in the market for some cool pitchers to keep in the fridge. Right now my system looks a little Survivor/Canteen, but no one cares.

Along with my friend (We’ll call her ‘Joann,’) I’d like to thank the internet and one of my trusty cookbooks by the Happy Herbivore for a little guidance.

 Please enjoy yourself in the kitchen, and never get stressed out. This is fun. Demistifying the idea that daily items need to be made in some magical facility brings me so much joy, and I will be happy to pass along any info I deem worthy of a household’s attention. We are all looking for ways to make life easier, friendlier, safer, and cheaper. Word to the Bird.


Instant Indian/Mediterranean Fusion Dinner

You too can prepare an instant plant based meal in minutes.

You too can prepare an instant plant based meal in minutes.

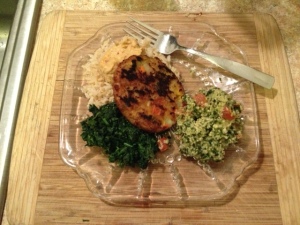
Tonight’s dinner is brought to you from the instant part of my freezer and fridge.  I wanted to throw something together quickly after family fun night which we could get on the table without a stop to Instant Grossburgermatic or a call to Deliver a BigFatCheesePieQuick.  A glance in the icebox returned this feast with very little preparation time.

Frozen Chopped Spinach– quickly becoming a staple. Frozen broccoli has long reigned supreme in its usefulness in our freezer, but we are making room for new greenery.  A quick heat in a cast iron skillet with some veggie broth, garlic and onion powder. Viola, spinach.

Lastnight’s reheated rice- Always make too much rice.  It heats wonderfully in the microwave covered with a little liquid added. This is a brown jasmine.

Cedarlane Foods Quinoa Tabouli– From Costco.  A little more oil than I would prepare myself, but not bad at all. Surprisingly fresh and green tasting.

Sabra Garden Hummus, Tuscan Herb– Any kind will do, but this flavor is delicious.  Like all store bought hummus, much higher oil content than I would prepare from scratch, but having hummus always on hand is an absolute must. Learn to make your own, oil free!

Trader Joe’s Vegetable Masala Burger– This is one amazing tasting patty. Please give it a try!

In less than ten minutes, I had this plate pulled together for the family and it felt like we were at a buffet.  Now, I do usually like to make things from scratch, you can have a much greater control over your fat content and ingredient purity.  These items pass the test in our house for “tasty healthy vegan fast food.” Let’s face facts here, we all want to make the healthiest possible, purest, clean, perfect food for our families; but its nice to find those quickies that don’t break the bank, can fit into a time crunch, and don’t violate all of your food rules.

Living Plant Based doesn’t have to mean you travel 15 miles to the well to gather the purest water and then stone grind all of your ingredients fresh from the field.  Although that does sound like a fun family retreat.

Happy Eating Out There!

🙂 Britt